Sunday 31 December 2017

Artline Monday - New beginnings

Happy New Year!  It feels completely crazy that it is 2018 already and we have a whole new year stretching ahead of us, what will you do over the next 365 days, what do you want to achieve?  Today is the perfect time to sit and reflect on what you want and maybe commit that list to paper to remind you of your goals.

Starting again


The start of a new year is also a great time to start a new notebook so I grabbed this large dotted one and got to work with my black Artline brush marker and fineliner to write down my hopes and wishes.  To make things look a little more interesting I mixed different fonts together and added a few doodles too.  The brush marker is one of my favourite pens for trying out different types of lettering, I just love how it writes! 

Adding colour

I thought the black and white page was a bit plain so I added some colour using more of the Artline 200 fineliners and then it looked much more me!  Now whenever I use this notebook throughout the year the first page will remind me of everything I want to do and inspire me to act on it all!

So will you be making a plan for your year or will you just see where it takes you?  Either way I hope it is a fantastic one for you!

Friday 22 December 2017

Artline Monday - More rock painting fun

So last month I tried my hand at rock painting for the first time, my girls and I decorated some stones and pebbles using lots of lovely Artline products and it was a lot of fun but we didn't do the second part of the task which is hiding the painted rocks outside for other people to find them!  The girls decided that they liked their rocks so much they were going to keep them and I said I would have to get some more stones to decorate and hide which I have now done.


Our rocks, paint markers, poster markers & OHP 853 pens

Like before we started off painting the rocks with watercolours and Artline poster markers.  

Starting to decorate the rocks

Once the base coats were dry we added details using OHP 853 markerspaint markers and Artline 999XF metallic pens.  As it is December we drew some Christmas designs and some New Year's ones too.  I especially like how the Christmas tree and firework stones turned out and my youngest daughter loves her bright pink present rock!      

Our painted rocks

On the back of each rock I wrote a message for the person who finds them using the OHP markers.  It says whoever finds the stone can either keep it for themselves or rehide it somewhere else.  I have also asked them to share a photo of the rock online using the tag #ArtlineRocks so hopefully I can see where they end up!

#ArtlineRocks message

After varnishing the rocks they were ready to hide!  We took our stones out with us and hid them in interesting places where they would hopefully be found and spread a little happiness!


Looking for hiding spots

Peek-a-boo!

Hiding a small stone

Left on a fallen tree trunk

Happy New Year!

Hiding on a bridge over the River Cole

This one is quite high up!

This rock is near a rugby ground

I confess, I brought this one back home with me!

Left out in the open so it can be found quickly in the park

Hidden in a planter outside a school

So now our rocks are out in the wild!  If you are in Birmingham you just might come across one but there are also lots and lots people painting and hiding rocks all over the UK so you could find one anywhere you go!  Just keep your eyes peeled!  I really hope our rocks are found and shared online, my girls already want to go back around and check on them all to see if they are still there!

If you would like to go rock hunting you can check on Facebook or Twitter to see if there is a group for people in your area or paint your own pebbles to hide and see if you can inspire others to join in with the fun as well!

Merry Christmas and I will see you again in 2018!


Planner Friday - December

How are we at the end of 2017 already?  My last Planner Friday post of the year is now up on the Trendy Twine blog, please stop by and say hi!

Oh my gosh!  I can't believe how quickly December has flown by!  I have been trying to squeeze every last drop of festive fun out of the month and I still feel like it has passed me by!  


Planning my week - before the ink

Products used:  Paper clips

For my last Planner Friday post of the year I want to show you how I have decorated this weeks spread.  I have a lot of things I still need to do before the big day so I thought making the pages pretty would help me keep calm and not panic too much!

I used washi tape at the top and bottom of my pages and then matched that with some lovely Christmas Trendy Page Dot reinforcements.  As well as looking nice and colourful the Trendy Page Dots protect my pages from tearing if I am leafing through them too quickly.  I think everyone who uses a ringed planner knows the pain of ripping a page so these are fantastic!


I love using APB's Christmas stamps in my planner, there are so many different quotes to choose from it is easy to find something that fits perfectly!  I have also been using them to embellish my Christmas card envelopes and gift tags this year so they are practical as well as fun. 

For my to do lists and reminders I used the Check It OffAt Home and More At Home sets and as it is the last week of school I have quite a few events to attend so the School Days set covered those for me.  Seeing so many notes and tasks in my planner usually makes me feel stressed but all the decoration just makes me smile and even more determined to get everything finished so I can enjoy the holiday!

You can read the rest of my post here.

Thanks for stopping by!


Monday 18 December 2017

Artline Monday - Christmas activities

I don't know about you but I find Christmas Day can feel like it goes on and on forever!  My children get up super early to open their presents and after that my husband and I are in the kitchen cooking up a storm while they play with all their lovely new things.  Once we have sat down and eaten our Christmas dinner there is a natural lull in the day, the adults are stuffed and often sleepy while the children are looking for something fun to do so I thought for today's post I would list a few activities they can do to pass some time over the holidays.

I think in most families there is always someone who buys stationery for children (in mine that's me!), get the kids to break open their new pens, paints and pencils and create some thank you cards, notes or drawings!  Here are a few ideas to get you started...

Make a card


Thank you cards

You can do the prep for this activity before Christmas, either buy a pack of plain cards from a craft shop or somewhere like Poundworld (that's where I got mine) or buy some card and cut and fold it into shape.  

The children can decorate the cards however they like, they could glue scraps of wrapping paper to the front, cut out pictures they like from Christmas cards or colouring books, they could draw or paint something or use some festive stamps like the Artline xclamations star stamp I used above.  Metallic pens like the Artline 900XF add a touch of sparkle and the white paint marker is great for drawing snow!

Design your own notepaper


Make your own notepaper

Again you can prepare for this beforehand, sort out some plain notepaper or plain A4 paper and fold it in half and cut it into two pieces.

The easiest way to decorate the notepaper is to create a boarder along all the edges.  Brush markers like the Artline Stixs are brilliant for drawing patterns and the Supreme metallic markers are fun too.  Washi tape and stamps are a really quick way to decorate the paper if you need to make a lot of sheets for your thank you notes.

Draw a picture


Thank you drawing

This one is really easy!  Get them to draw pictures as a thank you for their presents and then you can pop them into your thank you cards when you write them. 

Now, I said this one is easy but when I gave my six year old some paper and supplies she presented me with this lovely piece of modern art instead of a drawing.  I'm not one to stifle her creativity though and I'm sure one of her grandparents would like to pop this on their fridge so I just wrote thank you over the top of it using a metallic pen and praised her use of colour!

I hope you like my ideas and if you have any of your own please let me know!


Monday 11 December 2017

Artline Monday - Christmas decorations

Have you put your tree up yet?  I must admit mine has been up since the start of the month.  I love sorting through our decorations before I hang them on the tree and remember who brought them and where they came from, it's like a little festive walk down memory lane.  I thought this year it would be nice make some baubles with my children and create some new memories together.

Making Christmas decorations with Arline pens

The first decoration we made was for my son Hayden.  It is really hard to find anything with his name on it so our tree has lots of decorations with "Special Son" and "Special Grandson" on them instead.  I painted a plain ceramic bauble with an Artline poster marker which was quick and easy to use.  It also dried almost immediately so I didn't have to wait to paint both sides.

Painting the ceramic bauble 

Once the whole bauble was covered we used a silver Artline 900XF metallic maker to write his name and add some decoration.

Baubles, metallic markers & Artline 853 OHP pens

Because of how quickly the poster marker dried this bauble only took five minutes to make so if you wanted to make a few different ones for your tree or as gifts you could breeze through them all in no time!

On the tree

The second decoration we made was for my youngest daughter.  She loves anything sparkly so we filled a plastic bauble with fake snow, glitter and sequins before sealing it up tightly.

Filled bauble with fake snow, glitter and sequins

We then used gem stickers and an Artline 853 OHP marker to decorate the outside.  The overhead projection markers are great for writing on plastic and the ink is permanent so it wont fade or rub off over time. 

On the tree

Our next decoration was the fastest one to make, we used the 853 OHP makers again to draw coloured spots inside the bauble and some Artline Supreme whiteboard markers too.  Because the whiteboard markers were used on the inside the ink wont get erased if anyone touches the bauble.  

Drawing inside the bauble

The finishing touch for this decoration was a little gold bell added onto the ribbon. 

On the tree

The last tree decoration we made is my favourite.  We squeezed some gold glitter glue into the plastic bauble, sealed it up and then shook it vigorously to disperse the glitter around the inside. 

Fill the bauble with glitter glue

I used a gold Artline 900XF metallic marker to write Happy Christmas on the front of the bauble and then wrote my eldest daughter's name on the other side.

Happy Christmas

My daughter's name on the back

Before it was hung on the tree we added some gold gem stickers to the outside for some extra sparkle.

On the tree

Baubles aren't the only decorations you can make with Artline pens, we have been creating some festive rocks using the 853 OHP markers again!

Merry Christmas - rock painting

If you missed my rock painting post last month you can find it here for all the details.  The rock above was painted with a blue watercolour paint and then I added the snow using a white Artline paint marker, the rest was done using the 853 OHP markers and the finishing touches were done with the 900XF metallic pens.  Once it was all dry I varnished it so it will hold up against the weather if it was placed outside but at the moment it is sitting on the shelf in my hallway.

Decorate your windows with Artline pens

I mentioned the other week about the elf who comes to stay with us every December and he gets up to all kinds of mischief, well this week he used my Artline glassboard markers to decorate the windows on my front door!  Our glass is frosted so he had to write on the outside of the window so I'm not sure how long it will last but if you wanted to use these pens to decorate your windows you could draw on the inside of the glass and it would probably last the whole Christmas period.  The pens can be removed quickly with a damp cloth and I find it much easier to clear up than the fake snow spray I usually use to decorate our windows!

Would you like to win some Artline goodies for yourself or a friend?  Pop over to my Facebook page now for details on how to enter my giveaway!


Monday 4 December 2017

Artline Monday - Christmas card calligraphy

It's December!  It's time to get your Christmas cards written and in the post!  Since I have been practising my lettering and calligraphy this year I thought I would try and use my new skills on my cards and share some hints and tips with you today.

Christmas calligraphy 

It's okay if you are a complete beginner, you don't need to have had months of practice to make your cards look fancy.  All you need is a good calligraphy pen and some paper to practice the words you want to write.

I suggest you sit at a table or desk and angle your paper, notebook or card slightly to the left if you are right handed and to the right if you are left handed.  This will give you room to rest your arm on the table while you write and gives you better control over your pen.

On the down strokes you need to apply a little pressure to the pen to make your lines look nice and thick and then a light touch on the up strokes for much thinner lines.  Try doing these strokes a few times until you get used to writing this way with a calligraphy pen.

Practising in my notebook

The next stage is to practice the words you need to write on your cards and envelopes.  If you don't have an idea of what kind of font you want to use take a look on Google or Pinterest for some inspiration, just search for Christmas calligraphy and see what takes your fancy.  

Once you have found a style you like try and copy it on your paper or notebook and repeat until you are happy with how it looks.  When you are confident move on to writing it on your Christmas card or envelope.  Go slowly and take your time with each letter, rushing through the word makes you more likely to make a mistake.  

Depending on how many cards you need to send you might want to write them in batches instead of doing them all at once.  My hand seems to cramp up if I spend too long writing so I like to do five or six cards at a time and then take a break.  This also keeps my handwriting nice and neat as it gets messier the longer I write!

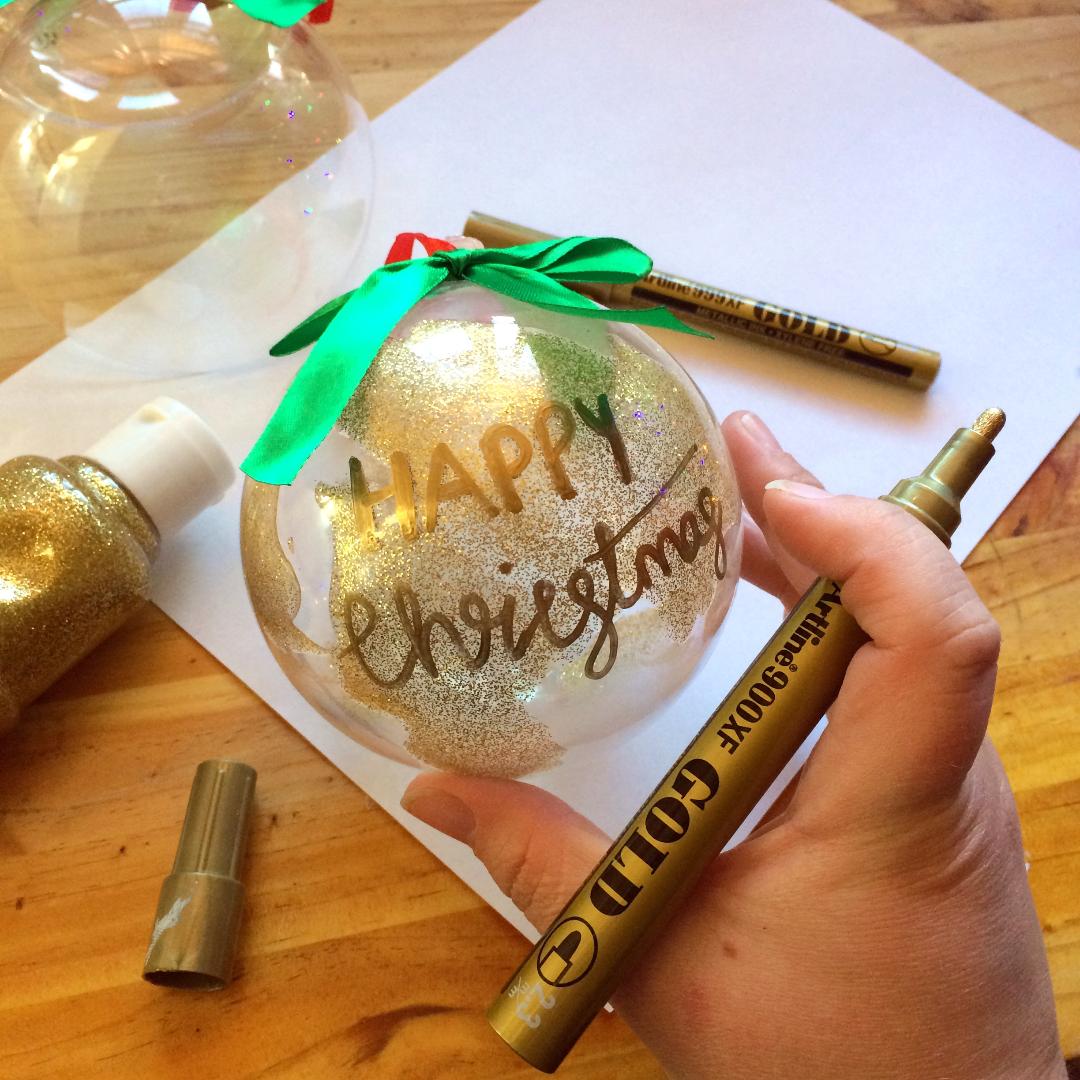
When I was practising I used a 3mm calligraphy nib but this was a bit big for inside my cards so I changed down to a 1mm nib instead.  The smaller nib was the perfect size for the cards and envelopes, leaving me plenty of room to write what I wanted to on both.

Slow and steady

I am only writing the recipients names in calligraphy on my envelopes, I will be adding their address in a clear, print font so it will be easy for the postmen and women to read when they are delivering my cards.  I used an Artline calligraphy marker for the names as it is permanent ink and water resistant and I will be writing the addresses with an Artline Supreme permanent marker for the same reasons.  These inks should withstand any rain or snow the cards might encounter along the way and not run or become illegible.

So, are you feeling inspired?  Will you being giving this a go with your Christmas cards?  I think I am going to go and finish mine off now so I can pop them in the post before the rush later in the month!

Monday 27 November 2017

Artline Monday - Christmas memory keeping

Can you believe that by the end of the week it will be December?  I don't know about you but I always feel like everything speeds up at this time of year and then suddenly it's January!  This year I've decided to keep a record of December, my youngest won't be little forever and I want to remember these times with her while she still believes in the magic of Christmas.  


Bullet journal style memory keeping

I've have a couple of ways to document the month I want to show you.  The first is my bullet journal layout.  You might remember my previous bullet journal post where I showed you how to get started and set up your journal, well I have a new journal which I am going to use solely for Christmas.  It is bright red and I thought it would be perfect for keeping track of our festive period over the years and it would become a nice keepsake for us to look back on.


The first spread covers the first week of December.  I used some stickers and washi tape for decoration and then gave myself sections to record things that happen that week using my Artline brush markers, fineliners and permanent markers.  The headings are Made me smile, Noteworthy, Favourite memory, Traditions, Holiday deliciousness and Elf mischief.  I feel the need to explain the elf one, we have an elf who visits us every December and he gets up to all sorts of things while he is here like covering our tree in toilet paper or filling the children's shoes with sweets.  Anyway I would like to record what he gets up to while he is with us, mainly so he doesn't repeat the same tricks each year.

I have also created a space for me to glue in a photograph for this week.  I usually take a lot of pics during December so I want to get a few of the best ones printed and keep them here inside my journal instead of left on my phone or camera.

More bullet journal ideas


For the second week I used more washi tape and stickers but I also used a couple of my Artline stamps as they matched my gold theme.  The gold star xclamations stamp is really easy to use because it is self inking so you just need to put it on the paper and press the top down.  The Merry Christmas stamp is the same design as well so I don't have to mess around with ink pads and stamp blocks to use these images.  For this week's headings I changed things up so I won't be writing about the same things over and over, the only sections I have kept the same are for the photograph and the elf's activities.  I used my yellow Artline brush marker and fineliner for the headings and then my gold Supreme metallic marker for some extra decoration.

I will be setting up the final three weeks of December over the next couple of days, if you have any suggestions for me please let me know!
  
December spread in my art journal

If bullet journalling isn't your thing you might prefer my art journal spread.  I have used two pages to record some of my favourite things about December and what I am looking forward to.  I love watching Christmas films, to be honest my girls and I have been watching them since the start of November but we have saved the best ones for December and I have a list of them on the first page.  On the second page I have a few different sections, the list on the journal tag is the things I need to do but they are also things I love to do too!  Then there are a few of my favourite festive food and drinks and a reminder to leave out some cookies and milk for Father Christmas and a carrot for Rudolph.  Lastly there is a space for a photo of my children that I am going to take on Christmas Eve when they are in their new pjs and excited about the big day!

Will you be keeping a record of your December?


Friday 24 November 2017

Planner Friday - Novemeber

I'm getting over excited about Christmas today on the Trendy Twine blog, pop over now to see my latest Planner Friday post....

Yes!  We are so close to December I can almost taste it!  I can't wait for the festive period to start so I thought for this month's Planner Friday I would show you my Christmas themed spread in my Travellers Notebook.


My Christmas spread


I wanted to record some of my favourite things about Christmas and list the things I am looking forward to doing next month so I got to work with my Annie's Paper Boutique stamps!  I absolutely LOVE my Christmas stamp sets, they are full of fun and quirky quotes that are perfect for journalling, card making, gift tags and lots more!  

On the first page I have used the Christmas Movies stamp from the This is December set for the list of films I want to watch over the holidays and I added a couple of stamps from the Foodies set as there will definitely be snacks involved while I watch them!  Frozen is a family favourite in this house so the Do you want to build a snowman? stamp from the Let It Snow set just had to make an appearance too!

On the second page I have a list of things I need to do but they are also things I enjoy.  I can't wait to put up the tree, cover the house in decorations, hit the shops to buy gifts and treats and then wrap it all up.  I also recorded some of my favourite things to drink and eat using the This Is December #2 and Drinks & More stamp sets and I have left myself a space to add a photo of my children I am going to take on Christmas Eve while they are waiting for Santa to arrive.

The last thing I did was to give myself a reminder that I need to put out some cookies and milk for Father Christmas and a carrot for Rudolph and I used the image stamps from my Perfect Pairs set for this.  I think they look super cute!


Stamp Block


You can read the rest of my post here.

Thanks for stopping by!


Monday 20 November 2017

Artline Monday - Ways to relax

So it's the middle of November and my Christmas plans are in full swing now but I still find myself stressing over getting everything ready in time, I guess I'm just a worrier!  I thought I would share with you some ways I relax when I feel a little frazzled in case you find yourself feeling more frustrated than festive over the next few weeks!

Ways to relax

Colouring books

I love how colouring in has become a big thing for adults now, there are so many different types of books to choose from so finding one to suit your style is easy.  Taking ten or twenty minutes out of my day to work on one of my pages relaxes me quickly, colouring in such small pieces with my fineliners takes my mind off everything but staying within the lines! 

Mindful colouring book & Artline fineliners

Baths 

A long hot soak in the bath or a refreshing shower washes away worries!  Take as long as you need until you feel ready to face the day again with a smile.

Journalling

Putting things down on paper is a great way to clear your mind.  Keeping a journal or diary can feel quite therapeutic as you have to spend some time reflecting on your day.  This gives you a chance to record your highs and lows and helps you address anything that is niggling away at you.


My journal

Walking

Go outside and get some fresh air, stretch your legs, wrap up warm and enjoy the chilly weather.  I love going for a walk in the evening when it is just getting dark and people have turned their Christmas lights on, it makes me feel excited about the holidays and takes my mind off my to do lists.

Art journalling

I'm not a great artist but I do enjoy drawing, doodling and painting and the best thing about keeping an art journal is there are no rules about how to do it.  I fill my journal with all kinds of things, memories about holidays and celebrations, things I want to remember and I usually do a spread dedicated to what I am looking forward to each month.  If you decide you want to start an art journal all you need is a notebook and a selection of pens and pencils while you work out your style of journalling.  Once you have found your groove you can try adding other materials into the mix like paints, collage and different kinds of paper and markers, the possibilities are endless.  Have fun!


My ode to Autumn in my art journal

What do you do to help you relax when you are feeling stressed?  I'd love to know!